Sunday, 27 November 2016

Another Starry Night....Somewhere Else.....


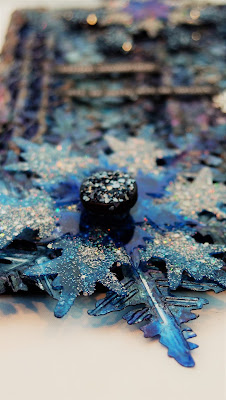
In for a penny...so second entry for the PaperArtsy alcohol inks and marker pens challenge! As I said on my previous post, I have not used these inks in a while. I don't see myself using them much again either as I much prefer paint although I do like the idea of colouring embellishments with them and I really enjoyed making the snowflakes on this project.

The canvas board was painted several weeks ago when my friends and I had a crafty day and we decided to do a little Christmas canvas. Needless to say I spend most of the day having a natter and drinking copious amounts of coffee with the plan of finishing the canvas that evening.....nope didn't happen! It has been glaring at me since then so this challenge was a godsend.

So the canvas was built up using corrugated card, and onion bag netting which I stuck down with heavy matt gel and then sealed with gesso....black if I recall correctly. I find it easier starting off with a black background and then going lighter. For some reason I really don't like working from light to dark and I never like the result.

I then used a variety of Fresco paints to produce the background....then the crafty day finished, friends went home and my poor little canvas lay there on the table, unloved, until now!!

I then cut some snowflakes using a couple of Tim Holtz dies, one of which had an embossing folder with it which I thought would look good with the alcohol inks...got this ides from the challenge blog post. I cut the snowflakes out of the plastic packaging that the dies came in.

I embossed the large snowflake using the embossing folder. I then used a variety of blue alcohol inks on it. I also coloured a couple of the smaller snowflakes with the inks.

One of the snowflakes was covered in heavy gel and then dipped in blue glass glitter. Another couple were covered in silver glitter.


Then I dripped some inks onto the canvas. Additionally I dabbed some silver glitter around the edge of the canvas which I then tinted with ink in an espresso colour.


Oh I also used an old typewritter key, which I coloured in blue ink and filled with glass glitter, as the centre of my main snowflake flower.

I then attached the snowflakes to the canvas, added a sentiment and....tadah!!

Thanks for visiting and happy messiness to ya xxxxx

Saturday, 26 November 2016

PaperArtsy Challenge

STARRY STARRY NIGHT


Hi All, this is my entry for the PaperArtsy challenge on their blog on the theme of alcohol inks and markers.

This was certainly a challenge as I haven't used alcohol inks for years...bought a few feeling all enthusiastic then I was distracted by the next shiny painty product and they were left languishing in a dusty drawer...poor, sad inkiwinkies!!

I think my technique is as dusty as the inkies as I did use several different shades of blue and a couple of different brands...Adirondack and Letraset... and I managed to blend them all into ome shade!!

So I mixed silver glitter with heavy gloss gel and applied it to the acrylic substrate through a Thats Crafty mini starry stencil....onto what would be the back of the finished piece. For those of us new to working on acrylic (2nd project with them for me) you work backwards. So the layer you want to be most visible will be applied first.

When the gel was dry I applied the ink using a blending tool. I then lost the plot a bit and dripped ink directly onto the substrate, then added blending solution, then let it dry and then did the same again! I ended up with quite a grungy background which I liked.


Next I applied some embossing powder around the edges of the triptych. I didn't want a neat look, more like snow on a roof and flakes being blown by the night wind... get me!!!

I then applied some silver paint through a word stencil and when dry I scribbled around the words with a black pen. I'd also embossed a cardboard christmas tree to which I added some sequins.


Silly me...I forgot to say that I attached some old book paper to the back of the triptych with matt medium!!

tadah!!

Thanks for visiting and happy messiness to you xxxx


Friday, 11 November 2016

LIVE LIFE LOUD


Hi Everyone,


This is the piece I have entered into the challenge.

I used the following products:

Canvas board
Fresco paints in Inky Pool
Concrete
Bubblegum Pink
Tango
 Eggplant
Yellow Submarine
Limelight
Glass Blue
London Bus
Beach Hut
Little Black Dress
Snowflake
Black Gesso
Archival Ink Pad in black
Andy Skinner stencil
PaperArtsy stencil 020 Emma Godfrey
Grungeboard letters
Glue

To start I covered the board in black gesso. This is my go to gesso as I find it easier make a project lighter rather than start of with a white background although with this technique it does not matter what your base colour is within reason. Apart from canvas board I love using cereal packets and I don't always gesso them so sometimes my background will be grey or kraft coloured...all work.

An apology here for the poor photos. I started this project as a quick run thru for a friend, so was not intending to blog it. Then I thought I may as well get more blogging practice in!!

Also a big acknowledgement to Seth Apter and his fabulous techniques and inspiration. I now 'sethify' on a frequent basis! See...I even invent new words!! OK back on track...

Right once the gesso was dry I picked two colours to do my background. I find that using a dark and a light colour work best for me.I used Inky Pool and Concrete. I poured a litte of both directly on the board and spread them with my brush, trying to keep them in two distinct areas. I then scribbled through the paint with the end on my paint brush...very randomly.


I repeated this process for another two layers, alternating where I put the paint, ie, dark on light then light on dark. At this stage it won't look like much but keep going...


Next I put a little of each paint onto pieces of embossed wallpaper, roughly brushed the paint over it and then dabbed the paper onto my painted board,,,,again, in a random pattern. I also used corrugated card. I alternated applying the colours until I was happy with the background.


Next I edged the board in black using the archival ink. I stencilled stars onto the background using Snowflake after which I stencilled the figure using Little Black Dress.


I then painted the stars in a variety of colours and some grungeboard letters that would be part of my quote.


Finally I used a black pen to scribble round the stars and parts of the background and glued on my quote....Tadah!!

Thank you for popping over and having a look. 
Happy messiness to you all xxxx


Monday, 7 November 2016

Typographical Transformations

Hi everyone!

I was really chuffed to be asked to do a blog post for PaperArtsy on the Typography theme. I  chose to use the new Tracy Scott stamps which I love, particuarly for journalling.

For this project I went back to my old faithfuls...coffee cans and a chocolate box...sadly emptied. I love repurposing items and I drink lots of coffee so a match made in heaven!


So I started by gessoing a few tins. I didn't bother with the chocci box as it was already white. Two of the cans were done for later projects. While the gesso was drying I tore up a selection of old papers that had a variety of fonts. I tore them into differing sizes and then attached them to the tin/chocci box using matt medium. I was not too particular about this part so applied them fairly randomly.

When this was dry I decided I wanted the background colour to be a bit more uniform so I applied a coat of Nougat which I watered down slightly.


Then I heat embossed a variety of the ETS01Tracy Scott stamps and a couple of the PaperArtsy background stamps, BG4 and BG5 onto some deli paper using black embossing powder. On the reverse of the embossed side I coloured in the images with a variety of Fresco paints. I chose to do two different colour schemes but I think I am going to have to do another tin to match the chocci box!

For the box I used Sour Grapes, Eggplant, Lavender and Moonlight. For the tin I used Guacamole, Bubblegum, Haystack and Carribean Sea,


I then cut out the images I wanted to use and attached them to the tin/box using matt medium. When this was dry I drew around the images with a Stabilo pencil...one that can be used on different surfaces...after which I used a fine wet brush to blend around the stamped images. I did this because I wanted to add a bit if definition and give a more grungy look.


I added paint drips and splatters in gold onto the can and on the box I roughly sponged the edges in black paint...Little Black Dess of course!! I think I am on myn 6th bottle of this as I used it so much.


When this had all dried I sprayed a shine spray onto both....very heavily and a couple of coats as I wanted to both seal them and give a glossy accent sort of effect.

Tadah!! Finished and had lots of fun. Two more storage containers for my craft room....when I can get into it but! I am going to be brave (or mad...its all perspective no?) and post some photos of my craft room...before and after the mega tidy. This is so I will NEVER let it get so messy again...at least not for a few months.

A huge thank you to Paperartsy for giving me the opportunity to do this.
And a massive thanks to all of you for visiting and happy messiness to you all xxxx